Monday, January 24, 2011
- Right Click My computer and select Manage option to open the management console
- Select the storage devices option...will show all disk drives mounted on your system
- select the recovery partition from it and right click to select "Change Drive Letter"
- click the Remove button to remove the drive letter and confirm.
Sunday, September 12, 2010
Again i dont recommend any Programs and utilities. Just use your browser to download. Surprised ? Do it like the following....
Watch your favourite video in facebook using internet explorer. (Finish streaming- watch full)
Then Go to Tools > Internet Options
Select Settings under Browsing History section.
Click on View files from Temperory internet files. This will show all files that you used during this browsing session. Find the Files with the .flv files and copy to your hard disk location where ever you want. Thats it. Finished. Lets start Playing.
Thursday, September 2, 2010
4. This will lead you to the voobys.com site.
Thursday, April 15, 2010
This is one problem that i recently notice which happens to most of the users who are using External hard drives with their laptops. After connecting and transfering data from their external hard drives, some laptop refused to boot to the OS the the next boot and this is happening mostly to Windows xp operating system. I solved the issue with the following simple steps.
The problem happened because of the external hard drive. When this external hard disk was connected, some values inside the laptop bios setup changed expecially with the hard disk mode. This caused the laptop from booting into the laptop hard drive. Just change the hard disk mode and laptop will be back to the working condition.
Comment if this worked for you......:)
Sunday, April 11, 2010
Wi-fi network not showing up in connect to a network list
0 comments Posted by ShineOnline at 9:16 AMThis can happen due to many reasons. Suppose that you build a network (Wi-fi) and sometime some users complain that they are not getting the network or the network is not showing in the 'connect to a network' list. When you restart your wifi router, sometimes it gets functioning. But not everytime. So what is a permanent solution for this problem. What will be the problem? Here is the steps which i did to solve the issue forever.....
1. Login to your router with your administrative password
2. Check whether your router is broadcasting the SSID which is used to identify the network
3. And the third and most important step, to check the 'Channel Settings' of your router
4. Change the channel from 'Auto' to a setting of 9 or 11 (Both channels are good)
5. Save the settings and restart the router.
By now you should be connected automatically if the connection property is set to 'connect automatically when this connction is avilable'. If not, go to the connect to a network from your taskbar, and select the network. Now the problem is solved! Hurray!
Comment Your experience if it worked for you......!
Tuesday, March 2, 2010
Netsh winsock reset is a useful command which you can use to reset the windows sockets API which is often known as winsock.Winsock defines a standard interface between a windows TCP/IP client application (FTP client or a web browser) and the underlying TCP/IP protocol stack.You can try this command when you have done all those things you know to solve to a problem related with network or internet connectivity.This commmand will set your windows TCP/IP settings to a factory level setting and makes it fresh and new as installed.
You can try the command if you experience anything like the following..
1. Cannot connect to internet after adware,spyware,virus,trojan horse,worm removal or cleanup
2. Lost network connection after installing/uninstalling any network support program
3. Cannot access any webpages/can only access some web sites only
4. No network connectivity due to registry errors
5. DNS Lookup error
6. Fail to renew the network adapter's IP or other DHCP errors
7. Showing Limited Connectivity or No connections message
8. Unidentified networking problem
Now how to use
Windows Xp
Press Ctrl+R and type cmd and enter
If you are not familier with DOS commands, you can also use Winsockfix command instead.
Windows Vista
Start>All Programs> Accessories> right click on the command prompt and run as administrator
After executing the command, dont forget to restart your computer.
Friday, July 3, 2009
The number of documents or files that you recently accessed can seriously affect the performance of your system while booting up if you are not resuming from a previous session ie hibernation mode. You can see these recently accessed documents by taking a look at the documents item on the start menu and hence it spoils your privacy. Many of us know how to clear these files. One method is to right click the task bar to open the properties and select the start menu tab and click the customize button the then hit the clear button to clear the recent documents. Another method is to type 'recent' on the run prompt and select all files displayed and clear it. But what happens when we forget to do it in a hurry? You can make this action automatic and it will perform on each user log off or shudown.
Follow the steps to make it.
On the run prompt type regedit and bring up the registry editor.
Now navigate to this path
HKEY_CURRENT_USER\Software\Microsoft\Windows\CurrentVersion\Policies\Explorer
Make a new DWORD in there with the name ClearRecentDocsOnExit and give the value '1'.
Done!
Warning...!!! If you are not very familiar with editing registry, please backup your registry before you proceed. Perform this tweak at your own risk. Astalavista!
Monday, August 4, 2008
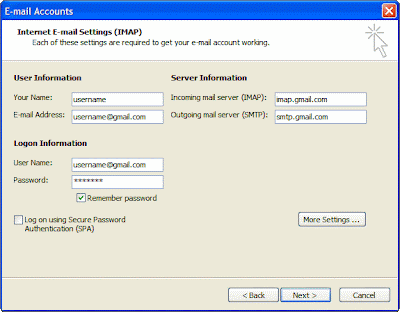
1. Open Outlook 2007
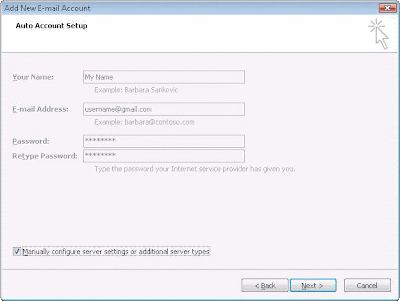
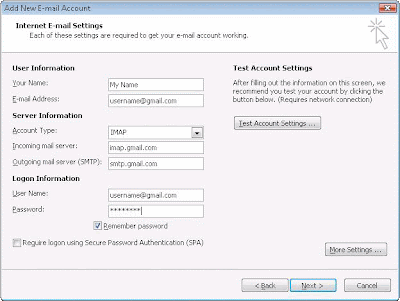
- Select IMAP; use given incoming/outgoing servers
- Username should be full gmail address
- After this screen, clicking Next takes you to the end of the setup.
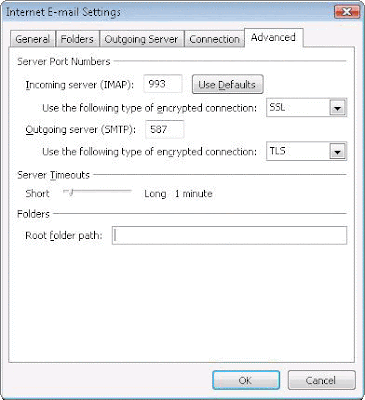
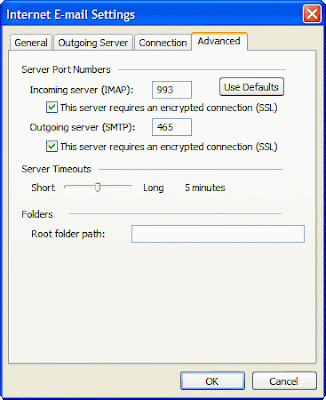
- Incoming server must be 993, and must use SSL Encryption
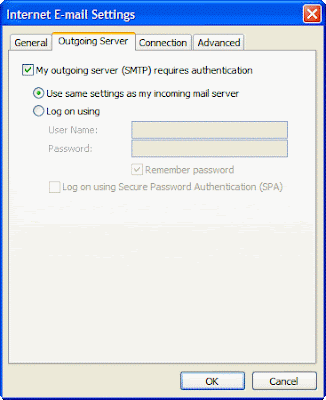
- Outgoing server can use 587, TLS Encryption.
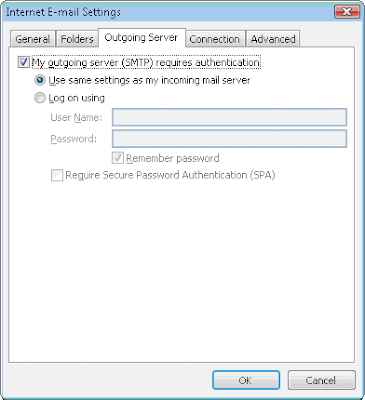
1. Enable IMAP in Gmail. Don't forget to click save changes when you're done.
Saturday, May 24, 2008
This is a problem caused by a virus. Even if you have an antivirus installed in your system, some virus can get into your system and cause this problem. Here the problem is caused by a virus in the form of a file called 'Autorun.inf' which is responsible for each drive to work in autorun mode. If you right click your drive you can see an additional item at the top of the shortcut menu as 'Auto'.You can simply solve the problem by removing the above mentioned file. But before that you should do some steps to find the file. The steps are as follows.
1. Go to the -> folder options
2. Select the View tab
3. Under 'Hidden files and Folders', uncheck the 'Hide protected Operating system files' option
4. Select option 'Show hidden files and folders' under hidden files and folders
6. Now press Ctrl+E to activate search and click - all files and folders
7. Enter "Autorun.inf" in the file name box
8. Now click- "More Advanced options" to see advanced options
9. Check 'Search system folders' , 'Search hidden files and folders' and 'Subfolders'
10. Click search and find the file named 'autorun.inf' with a root location such as c:\ or d:\ or so.
11. Delete the file from each drive. Now restart the system. Hurray! Problem solved!
Labels: Cannot open drive, open with window
You can simply solve the problem by following some easy steps as follows...
Boot up with the windows Xp cd in the drive and go to the recovery console when asked.
At the command prompt type: Bootcfg/rebuild and press enter
or
Copy drive:\i386\ntldr c:\
Copy drive:\i386\ntdetect.com c:\
* If you are prompted to overwrite the the file, type Y, and then press enter.
Labels: Ntldr missing problem
Sunday, May 4, 2008

This problem is cause by a virus. When the user tries to log in to the Orkut, a message is prompted as follows.
This is a problem caused by the virus called Heap41a.exe
To solve the problem temporarily, follow the steps,
Press Ctrl+Alt+Del to wake the Taskmanager
Go to the process tab and watch for svchost.exe
svchost.exe is a system process actually
but the virus will be working with the same name as processes
Now search and find svchost.exe with your current logged user name.
Not the svchost.exe with other such as LOCAL SERVICE, SYSTEM, NETWORK SERVICE
Right click the svchost.exe with current user name and Click end process.
Thats it! Now you can log into your Orkut account.
But the problem can occur again because the virus is still on your system. To permanently solve the problem, follow the steps
open my Computer on your desktop
Enter c:\heap41a on the address bar
This will show a collection of hidden files along with a file named svchost.exe
delete all the files by pressing Ctrl+A and then Shift+Del
If your are not allowed to delete the svchost.exe, first do the endprocess procedure we explained before, and continue with deleting again.
I strongly insist you to use an anti virus and antispyware to make your system free of viruses and spywares.
Labels: Hohahaha message, Orkut Banned
Friday, February 22, 2008
REG\add HKCU\Software\Microsoft\windows\current version\policies\system /v
DisableTaskManager /t REG_DWORD/d 0/f
User Configuration / administrative templates / system / Ctrl+alt+Delete options / Remove Task Manager
Labels: Task manager disabled
Solve the problem using the following steps
Click start, run and Type Services.msc and Click OK to launch the Services Window.
Select the item "Remote Access Auto Connection Manger"
Right click the item to select Properties and Select the Startup Type List box to select "Disabled"
If it is already started, you can stop it by pressing the STOP Button on the properties.
Enjoy the Error free environment!
Labels: Dial up window poping up
Saturday, February 16, 2008
Go to run prompt and type regedit to enter the system registry
Follow the path---------
HKEY_LOCAL_MACHINE\
SOFTWARE\
MICROSOFT\
WINDOWS\
CurrentVersion\
Explorer\
Advanced\
Folder\
Hidden\
SHOWALL
On the right pane select the 'CheckedValue'(DWORD) value and Right click to select 'Modify' and Change the value from '0'(zero) to '1'(one)
Now move back to the explorer and select the 'show hidden files and folders' again. Now you can see your hidden files.
Labels: Show hidden files
Well! Here is a solution that you can try!(Win XP)
Type GPEDIT.MSC on the run command window (Window Key+R)
Under 'User Configuration'click to expand Administrative Templates
Now click and expand 'Windows Components' and select 'Windows Explorer'
Go through the items showed on the right pane to see the configuration item -> 'Removes the folder options menu item from the tools menu'
Select and right click to open the properties and make it 'Disabled' and then to 'Not configured'
Now the folder option item will be back on your Tools menu!
Labels: Folder Options item
Change Drive Name and Icon (All Windows) Popular
This tweak allows you to change the name and icon shown in Explorer for a specific drive letter.
Open your registry and find the key below. If the key does not already exist then create it.
Within the main key create a new sub-key with a single letter representing the drive letter of the drive to be modified. (e.g. [HKEY...\DriveIcons\D])
Within the drive letter key create another sub-key called "DefaultIcon" (e.g. [HKEY...\DriveIcons\D\DefaultIcon]) and set the "(Default)" value to equal the fully qualified name of the icon file. If the file contains more that one icon follow it with a comma and the zero-based index of the icon (e.g. "c:\icons\myicons.dll,4").
Create another sub-key within the drive letter key called "DefaultLabel" (e.g. [HKEY...\DriveIcons\D\DefaultLabel]) and set it's "(Default)" value to equal the label for the drive letter (e.g. "My ZIP Drive").
For example:
HKEY_LOCAL_MACHINE
Software
Microsoft
Windows
CurrentVersion
Explorer
DriveIcons
D
DefaultIcon
(Default) = c:\icons\myicons.dll,4
DefaultLabel
(Default) = My ZIP Drive
You may need to restart Windows for the change to take effect, or press F5 to refresh My Computer.
Note: The "DefaultLabel" value only works with Windows 2000 and higher.
-------------------------------------------------------------------------------------
System Key: [HKEY_LOCAL_MACHINE\SOFTWARE\Microsoft\Windows\CurrentVersion\Explorer\
DriveIcons]
Value Name: Default
Data Type: REG_SZ (String Value)
-------------------------------------------------------------------------------------
Labels: Change drive icons
Change the Active Desktop Safe Mode Background (Windows 98/Me/2000/XP)
This setting is used to change the image or web page that is shown when the active desktop is disabled due to a system error.
Open your registry and find or create the key below.
Create a new String value, or modify the existing value, called "Wallpaper" and set it according to the value data below.
Exit your registry; you may need to restart or log out of Windows for the change to take effect.
-----------------------------------------------------------------------------------
User Key: [HKEY_CURRENT_USER\Software\Microsoft\Internet Explorer\Desktop\SafeMode\
General]
Value Name: Wallpaper
Data Type: REG_SZ (String Value)
Value Data: Wallpaper Filename
------------------------------------------------------------------------------------
Labels: Active Desktop Back
Change the Default NumLock State (Windows NT/2000/XP)
The NumLock key is usually only turned on before the user has logged into the computer, this can cause problem for people with portable computers that do not check the status of the NumLock key before typing their password. The default behavior can be changed with this setting.
Open your registry and find the key below.
Change the value of 'InitialKeyboardIndicators' to either '0' for off, or '2' for on.
Note: This change will affect all users but value can also be changed on a user-by-user basis by modifying [HKEY_CURRENT_USER\Control Panel\Keyboard] using the same values.
Restart Windows for the change to take effect.
------------------------------------------------------------------------------------
Value Name: InitialKeyboardIndicators
Data Type: REG_SZ (String Value)
Value Data: 0 = NUMLOCK is turned off after logon, 2 = NUMLOCK is turned on after logon
------------------------------------------------------------------------------------
Labels: Numlock State
Change the Icon Cache Size (All Windows) Popular
If you desktop icons are redrawing too frequently or are corrupt, it could be because the icon cache is full. Try increasing the size by changing this setting.
Open your registry and find the key below.
Create a new string value, or modify the existing value, called "Max Cached Icons" and set it to "2000". This will increase the maximum icon cache to 2MB.
Restart Windows for the change to take effect.
-----------------------------------------------------------------------------------
System Key: [HKEY_LOCAL_MACHINE\SOFTWARE\Microsoft\Windows\CurrentVersion\Explorer]
Value Name: Max Cached Icons
Data Type: REG_SZ (String Value)
Value Data: 100 - 4096 (default = 500)
-----------------------------------------------------------------------------------
Labels: Troubleshoot icon problems


